Everything you need to know about the capo on classical guitar
In this article we’ll talk about how to use a capo on classical guitar. A capo is a wonderful tool that every classical guitarist should have. It allows us to change keys easily, to play music at different pitches (such as Renaissance and Baroque repertoire), and can make playing some difficult material easier. So let’s talk about what a capo is and why and how to use one.
What is a capo?
 A capo is a small device that you attach to the neck of the guitar to change the string or “scale length” and thus the pitch of the open strings. On the guitar we measure the “scale length” of a guitar by the length of the resonating or vibrating string. Just like measuring the distance between yarn strung between two pins on a corkboard map, we measure the string between two contact points: the nut and the saddle. And whenever we fret a note we also change the scale length of that string, effectively moving the nut up to the position of that particular fret.
The capo is like a moveable nut, allowing us to change the pitch of all six strings at once to (almost) whatever position we would like on the neck. And just like fretting notes will change the pitch, when we place the capo on a particular fret, all six open strings will now sound at the pitch of that fret. So, for example, if your guitar is in standard tuning (EADGBE, from low to high) and you place the capo on the fifth fret, the tuning of the open strings will now be: ADGCEA (from low to high).
Why is it called “capo”?
The term “capo” comes from the Italian capodastro or capotasto, which means something like head of the touch. (In Spanish a capo is called cejilla, “little eyebrow.”) It basically refers to the headstock of the guitar, which is close to where the capo is often placed.
What is the best capo for classical guitar?
Does it really matter what kind of capo you have? Yes, you will need a capo specifically designed for classical guitar because of the way neck profiles differ from classical to other style guitars. Acoustic and electric guitar capos fit the radiused fingerboard of those instruments and so will cause buzzes on our flatter profile fingerboards. There are several options for a classical guitar capo. (The prices below may have changed.)
- Kyser Quick-Change Classical Guitar Capo ($24.95 USD) – As the name suggests, the clamp style of this capo allows for “quick changes.” Unless you are performing with a singer or ensemble that requires many key changes, however, classical guitarists rarely need to make quick changes like this. The real downside of this capo is you cannot adjust the tension on the strings.
- G7th Performance 3 Classical Guitar Capo ($69.95 USD) – The real advantage of the G7th is it is very easy to use. You just slightly squeeze it and it’s ready to go. It is, however, at least double if not triple the cost of other capos.
- Shubb C2 Classical Guitar Capo ($29.95 USD) – A traditional option, this capo allows you to apply a tensioner knob to find the right tension, and then a clamp for easy changes. A great option.
 D’Addario NS Lite Classical Guitar Capo ($10.99 USD) – This one is the cheapest option, allows you to adjust tension, and is super light, adding almost no weight to the neck. Highly recommended.
How to use a capo
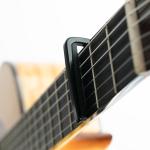
There are a few different types of capo, but the most popular are: one that attaches like a clamp to the neck via a spring, and another that attaches with a lever that screws the clamp tight. The capo should always be attached just behind the fretwire, not in the middle of the fret. This will give you the most clarity of sound and ensure you don’t get buzzes. If you use the first type of capo, simply clamp open the capo and place the capo next to the fretwire and then release to allow the clamp to close.
With the second type of capo, you will want to be sure you tighten the screw tight enough to remove any potential buzz. An easy test for this type of capo is first to place the capo on the strings next to the fretwire and tighten the screw just tight enough that it won’t move around as you continue tightening. Then play each string with your right hand as you continue tightening the capo screw with the left hand until all buzzes are gone. Once you hear no more buzz you can stop screwing with the left hand.
On which fret should you place the capo?
The beauty of the capo is that it is moveable. This means you can choose where you want to place it. There is some repertoire that works well with the capo at the second or the third fret (both Renaissance and Baroque repertoire originally written for the lute), but this music can be played without the capo and with the capo in different positions as well.
Why should I use a capo on classical guitar?
The capo is an extremely versatile tool and you can put it to many uses. For instance, Bach’s Lute Suite in C minor (BWV 997) is often transcribed into the key of A minor to make it easier to play on the guitar. But if you put a capo on the third fret and play in the key of A minor, now all of the notes will sound in C minor.
If you are a composer or arranger or accompanying a singer and you would like to try something in an unusual key, the capo allows you to do so easily while keeping familiar guitar chord shapes and voicings.
Likewise, if you play a lot of Renaissance and Baroque music you will want to use a capo on some pieces to brighten up the sound. This allows your guitar to sound more lute-like.
But there are other advantages a capo can bring as well.
Make technical challenges easier
A common obstacle many beginners face is that a lot of beginner classical guitar music is in first position. (Go here to learn more about playing in “positions” on classical guitar.) The trouble is, the stretch required between the fingers is greatest in first position. However, a capo allows you to move first position to, well, wherever you like.
And this is something we recommend to beginners at CGC Academy all the time. Try out an exercise or scale in a higher position where the stretch is more manageable. A capo makes this process even easier. You can place your capo on, say, the seventh fret, and suddenly the stretch that was impossible in first position becomes much more manageable.
What’s more, you can use it as a practice tool as well. Once you’ve mastered the stretch at seventh position, move your capo back one fret to the sixth. The stretch is just a tiny bit wider here, to give you a challenge, but not so much that it isn’t manageable. You can keep moving the capo down one fret at a time once you master each position until you get back to first position. So the capo can be a great practice tool for developing your left-hand finger stretch. If you have small hands give the capo a try.
We hope you enjoyed this look at how to use a capo on classical guitar and why you should be using one! Want more classical guitar beginner tips and learning resources? Go here to visit our Beginner Classical Guitar Resources page.
Simple explanation with good English meant I was able to follow instructions precisely
Capo can also make full barres easier for beginners to practice by lowering the action one fret from the capo.
Very interesting thanks!
How do you turn the capo? Are the “opening” of the capo to the treble or the bas side. Example with the G7, are there more pressure on the inner side or on the open side?
It’s informative 👌 thanks alot
Glad it was helpful for you, Nabhan!
Peace,
Dave B (CGC team)
What about custom capos that allow some strings to ring where that section has been removed from the capo?
Hi Bill,
Those are really cool, but not really as useful on most classical guitar music. If you are using a lot of alternate tunings, however, they can be extremely helpful. There are some use cases in classical guitar music where you might partially capo, that is, where you would, for instance, capo only the first five strings to leave the low resonance of the sixth string. But you can do this with any standard capo.
Peace,
Dave B (CGC team)
Question: Is the position (fret) of the capo related to the key signature of the music?
Hi Jack,
So sorry I missed your question. Yes! The position of the capo will change where the open strings occur, and that’s something you generally want to line up with the key you’re playing in. So, for instance, if you have four flats in the key signature (Ab Major)—this would be rare in classical guitar music of course!—you can put the capo on the first fret and play in G Major, giving you open strings on fourth, third, and second strings that work well in that key.
Peace,
Dave B (CGC team)
Tommy Emmanuel recommends pushing on the strings with the edge of the hand (especially the wound strings), over the sound hole once the capo is in place. This helps to ease uneven tension and reduces the need to retune. I use a steel string guitar but I imagine it can also be useful for classical guitars.
Thanks for the recommendation, Bill! Great tip.
Peace,
Dave B (CGC team)
I have wasted so much time and money on lessons.
Some years ago I completed a level two in classical guitar. Would there be any chance you might send me a lesson in level 2 to look at and the price for your lessons?
Thank you.
Hi Jonnie,
Thanks for your comment. You can learn all about the Academy and get prices for different memberships by clicking on the blue “Join CGC Academy” button at the top right.
While we have many Grade 2 lessons available at the Academy we don’t have many publicly available at the moment. You can watch all of our Free Lessons by clicking “Lessons” in the top toolbar. If you need any more assistance or specifics, you can reach out to me by email at: [email protected]
Peace,
Dave B (CGC team)